
Saved Shipments
The Saved Shipments page allows you to view and manage shipments that were created and saved directly in the SmartConsign Web Portal, but have not yet been assigned to a carrier.
A saved shipment is an unallocated shipment record. Its details have been saved in SmartConsign, but no shipping label has been generated.
Use this page to search for saved shipments, review their details, correct or complete missing information, create the carrier shipment, or delete records that are no longer required.
ℹ️ External-channel orders:
Orders received from Shopify, wooCommerce, eBay, or other connected channels are not displayed on the Saved Shipments page. Manage these orders from Marketplaces → Manage Orders.
A Saved Shipment is a shipment that was created and saved directly in the SmartConsign Web Portal but has not yet been processed with a carrier.
This means:
- No carrier service has been assigned.
- No carrier shipment has been created.
- No shipping label has been generated.
- No label can be printed or downloaded.
- There is no carrier shipment to cancel.
- The shipment details must be reviewed and completed before the shipment can be created.
A shipment may appear on this page when:
- It was saved from the Create a Shipment page.
- A carrier or service has not yet been selected.
- The shipment needs to be reviewed before it is created with a carrier.
ℹ️ Note:
Orders imported from external channels do not become Saved Shipments. They are managed from Marketplaces → Manage Orders.
Use the Saved Shipments page to:
- 🔍 Search and filter saved shipment records
- 📋 Review saved shipment details
- ✏️ Edit missing or incorrect information
- 📦 Complete the shipment and create it with a carrier
- 🗑️ Delete saved records that are no longer required
⚠️ Important:
Saved Shipments cannot be used for label printing, label downloading, or carrier cancellation because they have not yet been created with a carrier.
Before managing a saved shipment, make sure you know which record you need to find.
Useful details include:
- Shipment reference
- Customer or recipient name
- Delivery address
- Shipper
- Created or saved date
💡 Tip:
If you cannot find a saved shipment, check the selected date range first. The record may have been saved outside the current filter period.
ℹ️ External-channel orders:
For Shopify, Linnworks, eBay, or other connected-channel orders, go to Marketplaces → Manage Orders instead.
To open the page:
- Log in to the SmartConsign Portal.
- Navigate to:
Shipments → Saved Shipments
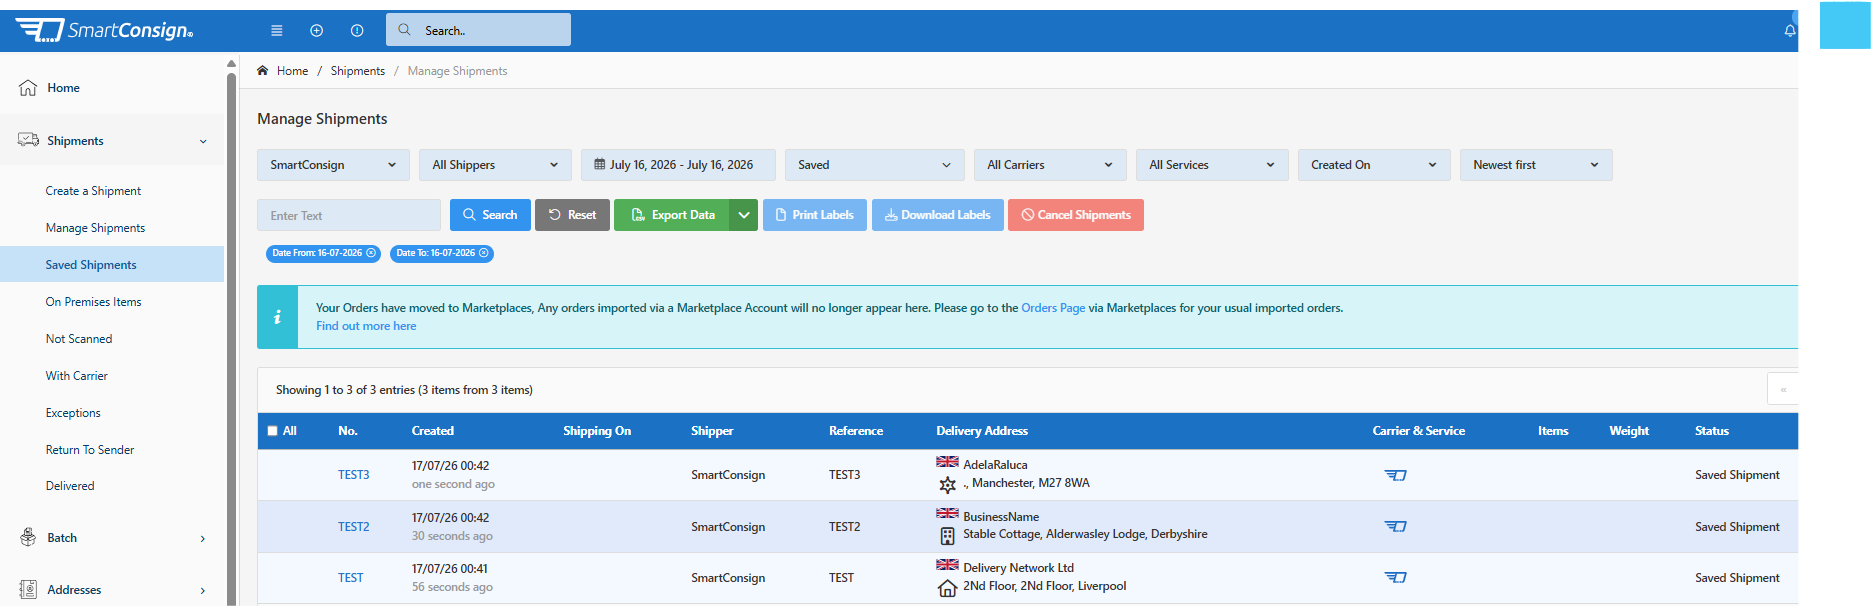
The page displays shipment records created and saved in the SmartConsign Web UI that are waiting to be reviewed, completed, created with a carrier, or deleted.
Orders received from connected channels are managed separately from Saved Shipments.
Navigate to:
Marketplaces → Manage Orders
Use Manage Orders for orders received from integrations such as:
- Shopify
- Linnworks
- eBay
- Other configured marketplaces or sales channels
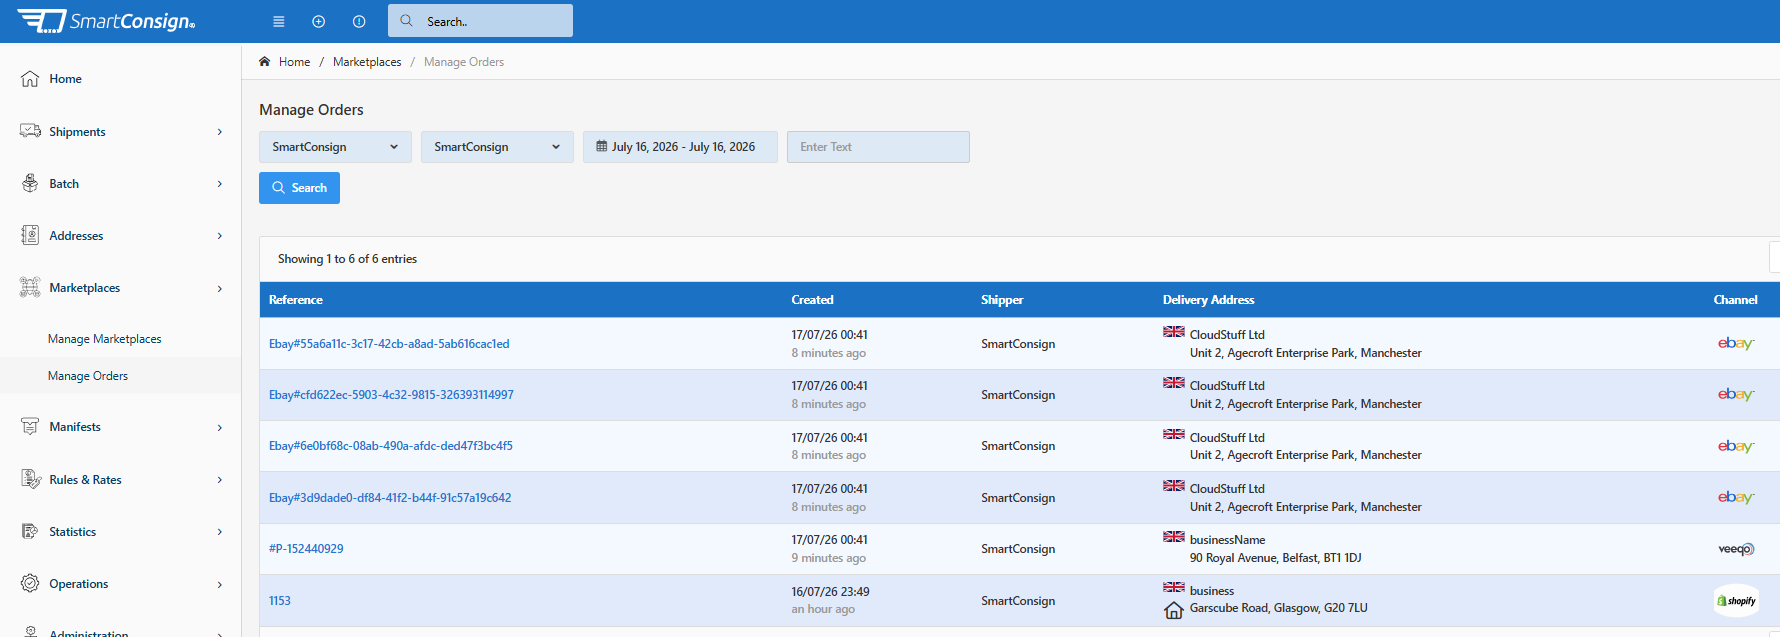
⚠️ Important:
External-channel orders do not appear in Shipments → Saved Shipments. Saved Shipments contains only records created and saved directly in the SmartConsign Web UI.
For more information, see:
The Saved Shipments page is divided into several key areas.
| Area | Description |
|---|---|
| 🔍 Search and Filters | Used to find saved shipments by shipper, date range, reference, or other available search criteria. |
| 📋 Saved Shipments Table | Displays saved SmartConsign Web UI shipment records that match the selected filters. |
| ☰ Actions Menu | Provides record-specific actions, such as editing or deleting a saved shipment. |
| 📄 Pagination | Allows you to move between result pages. |

Use the filters at the top of the page to narrow down the saved shipment list.
- Operation
- Shipper
- Date Range
- Created Date
- Reference
- Search Text
- Select the required filters.
- Enter the shipment reference, customer name, address, or other related text.
- Click Search.
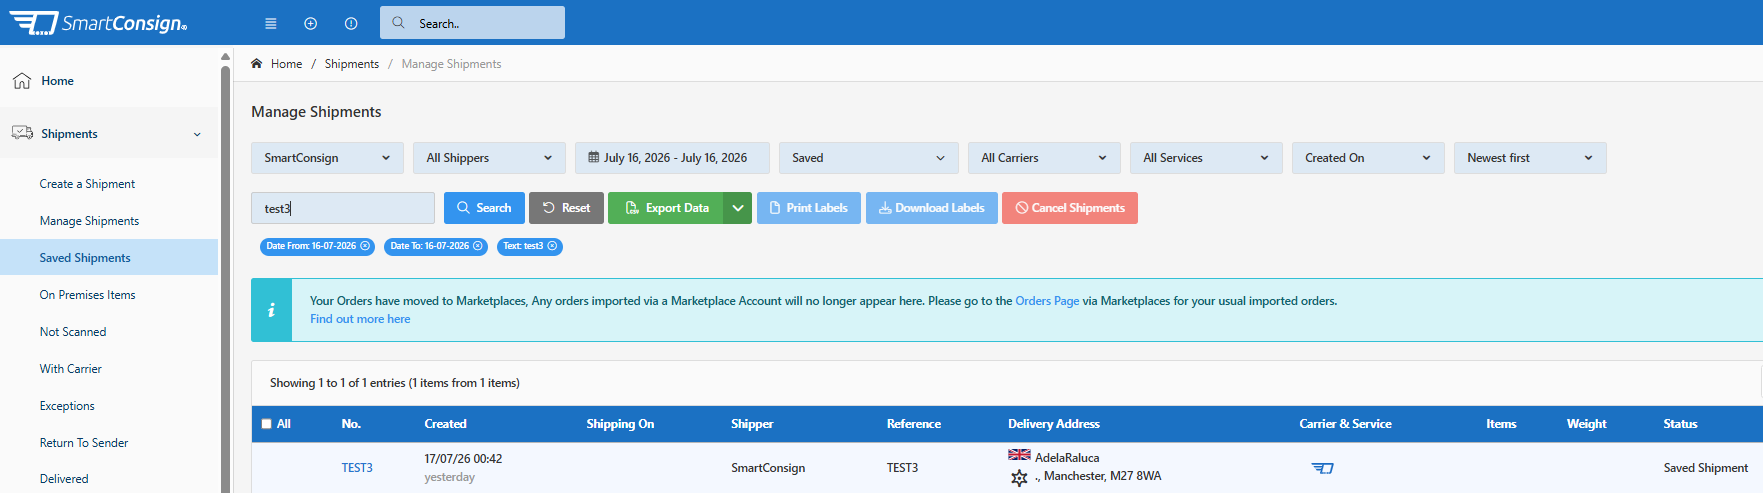
Click Reset to clear the current filters and search criteria.
The table displays the main information available for each saved shipment.
| Column | Description |
|---|---|
| No. | The saved shipment number or record identifier, where available. |
| Created | The date and time the shipment record was saved. |
| Shipping On | The planned shipping date, where available. |
| Shipper | The shipper associated with the saved shipment. |
| Reference | The shipment reference entered in the SmartConsign Web. |
| Delivery Address | The recipient name and delivery address. |
| Carrier & Service | SmartConsign logo until the shipment is created with a carrier. |
| Items | The number of shipment items or parcels. |
| Weight | The total shipment weight, where available. |
| Status | The current saved status. |
| Actions | Opens the available actions for the saved shipment. |
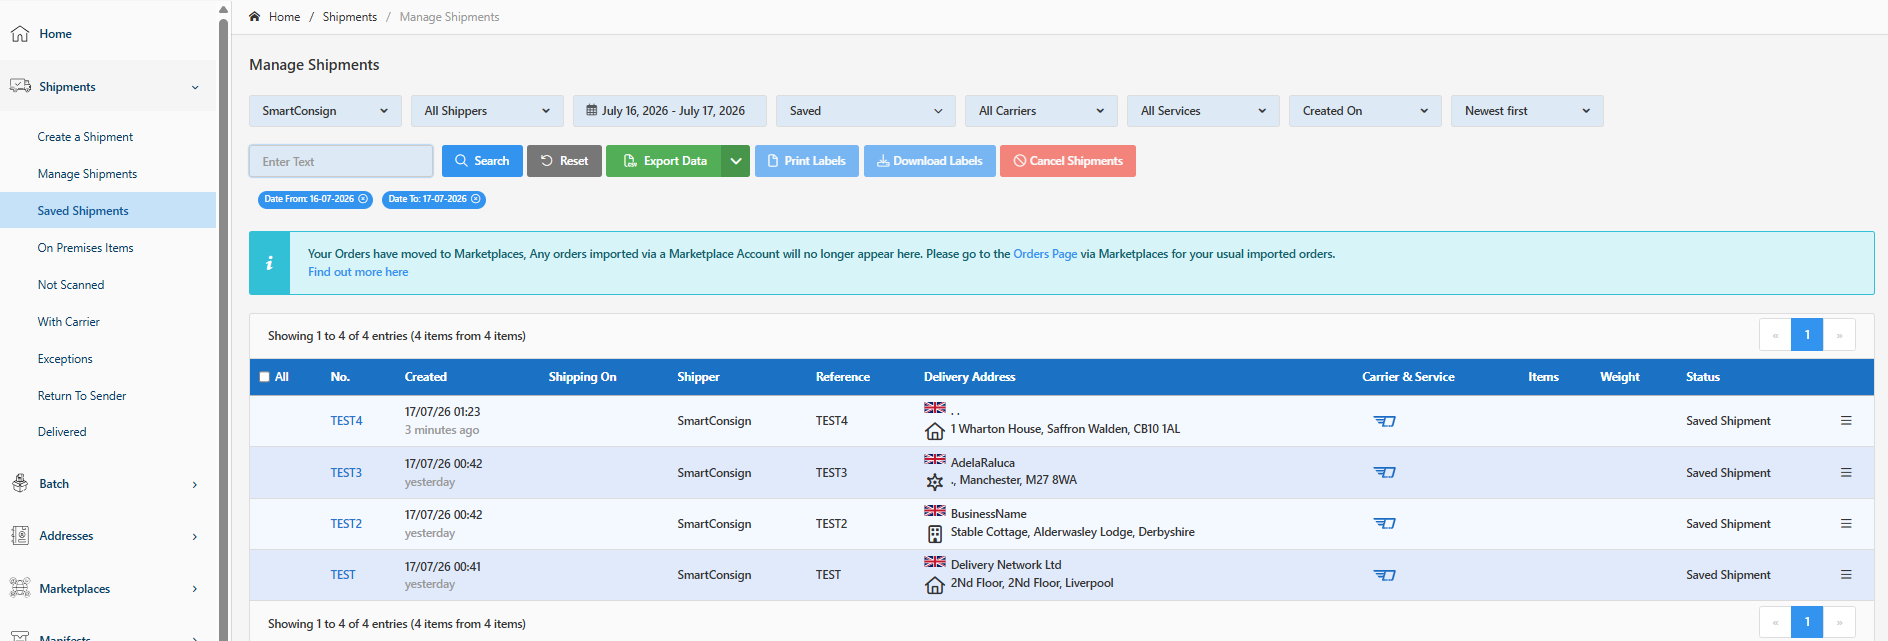
Each saved shipment row includes an actions menu on the right-hand side.
Click the menu icon ☰ to open the available actions.
Available actions may include:
| Action | Description |
|---|---|
| ✏️ Edit | Opens the saved shipment so that you can review or update its details before creating it with a carrier. |
| 🗑️ Delete | Deletes the saved shipment when it is no longer required. |

⚠️ Important:
Saved Shipments do not have carrier labels. Print Labels, Download Labels, and Cancel Shipments do not apply to saved, unallocated records.
Use Edit ✏️ when a saved shipment needs to be reviewed, corrected, or completed before it can be created with a carrier.
- Find the saved shipment in the table.
- Click the menu icon ☰ on the right-hand side of the row.
- Select Edit ✏️.
- Review the shipment details.
- Update any missing or incorrect information.
- Select the required carrier and service.
- Review the parcel information.
- Create the shipment when it is ready to be processed.
✅ Best Practice:
Before creating the shipment, check the delivery address, shipper, carrier service, parcel weight, dimensions, and any carrier-specific information.
Use Delete 🗑️ only when the saved shipment is no longer required.
- Find the saved shipment in the table.
- Click the menu icon ☰ on the right-hand side of the row.
- Select Delete 🗑️.
- Review the confirmation message.
- Confirm the deletion.
⚠️ Important:
Deleted saved shipments are not recoverable. Check the record carefully before confirming the deletion.
A saved shipment becomes a carrier shipment when all required information has been completed and the shipment is successfully created with a carrier service.
Before creating the shipment, make sure:
- The delivery address is complete and valid.
- The correct shipper is selected.
- The shipment reference is correct.
- Parcel weight and dimensions are entered.
- Shipment value is entered, where required.
- The correct carrier and service are selected.
- Any required customs information is complete, where applicable.
- Any carrier-specific required fields are complete.
After the shipment has been created with a carrier:
- A carrier shipment record is created.
- A shipping label may be generated.
- The shipment enters the standard shipment workflow.
- The record can be managed from Manage Shipments or the relevant shipment status page.
Check that:
- The correct Shipper is selected.
- The correct date range is selected.
- The shipment reference or search text is entered correctly.
- The record has not already been created with a carrier.
- The record was created directly in the SmartConsign Web UI.
For orders received from Shopify, wooCommerce, eBay, or another connected channel, go to Marketplaces → Manage Orders.
This is expected. A saved shipment has not yet been created with a carrier service.
Open the saved shipment, complete the required details, select a carrier service, and create the shipment before attempting to print or download a label.
Saved Shipments cannot have labels printed or downloaded because no carrier shipment or label exists yet.
Complete the saved shipment and create it with a carrier first.
A Saved Shipment has not been created with a carrier, so there is no carrier shipment to cancel.
When the saved record is no longer required, use Delete 🗑️ instead.
External-channel orders are not displayed under Saved Shipments.
Navigate to:
Marketplaces → Manage Orders
Use that page to find and manage Shopify, eBay, and other connected-channel orders.
Before creating a saved shipment with a carrier:
- Verify the shipment reference.
- Check the recipient name and delivery address.
- Confirm the correct shipper.
- Check the parcel count, weight, and dimensions.
- Select the correct carrier and service.
- Complete customs information, where required.
- Review any carrier-specific fields.
- Confirm that the shipment is ready before generating the label.
Most Saved Shipment issues can be resolved by checking the selected filters, reviewing the saved shipment details, and completing any missing information.
For external-channel orders, use Marketplaces → Manage Orders.
If you still require assistance, contact SmartConsign Support at support@smartconsign.io.