
Manage Shipments
The Manage Shipments page allows you to search, review, and manage shipments that have already been created in SmartConsign.
From this page, you can filter shipment records, print or download labels, cancel eligible shipments, and open the shipment details page for further actions such as tracking, rebooking, ticket creation, or manual scan updates.
This page is used for created shipments only. Saved shipments are managed separately from Shipments → Saved Shipments.
Use the Manage Shipments page to:
- 🔍 Search and filter created shipments
- 📋 Review shipment records and current statuses
- ☑️ Select eligible shipments for batch actions
- 📤 Export shipment information
- 🖨️ Print available labels
- ⬇️ Download available labels
- ❌ Cancel eligible shipments
- ☰ Open shipment-specific actions
- 📦 Open the Shipment Details page
- 🔄 Cancel and rebook an eligible shipment
⚠️ Important:
Available actions depend on the shipment status, carrier configuration, selected records, and user permissions.
⚠️ Manifested shipments:
A manifested shipment cannot normally be cancelled or cancelled and rebooked.
💡 Suggested video content:
Show how to open Manage Shipments, apply filters, search by shipment reference, select one or more shipments, print or download labels, open the row actions menu, and access Shipment Details.
To open the page:
- Log in to the SmartConsign Portal.
- Expand Shipments from the left-hand menu.
- Select Manage Shipments.
The page displays created shipments and provides filters, batch actions, and row-level shipment actions.
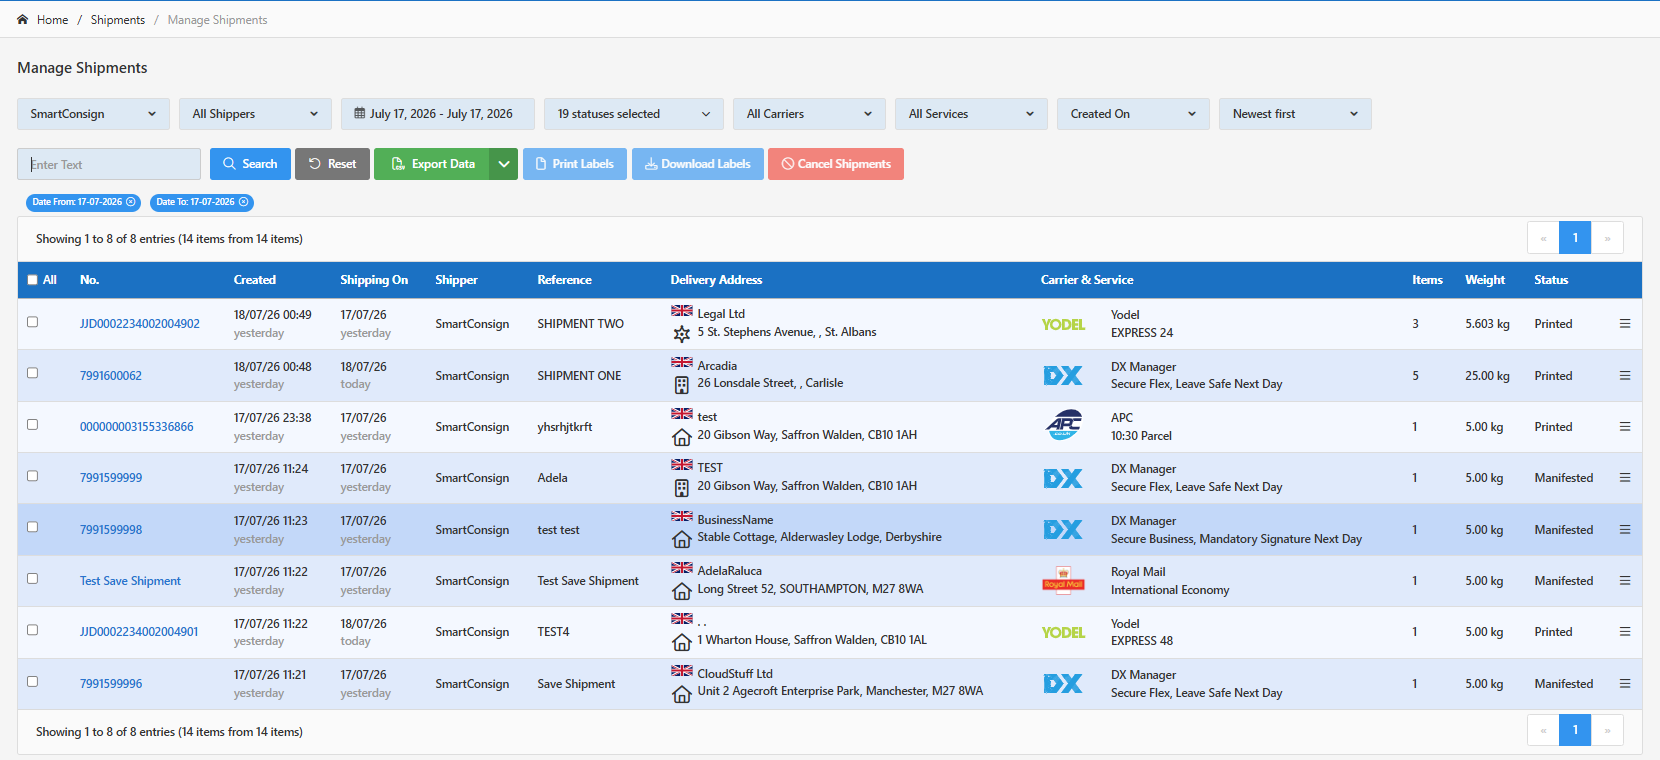
The Manage Shipments page is divided into several key areas.
| Area | Description |
|---|---|
| 🔍 Search and Filters | Used to find shipments by shipper, date range, status, carrier, service, reference, or other available criteria. |
| ☑️ Selection Column | Allows eligible shipments to be selected for batch actions. |
| 📋 Shipments Table | Displays shipment records matching the selected filters. |
| ☰ Row Actions Menu | Provides actions for an individual shipment. |
| 📄 Pagination | Allows you to move between pages. |
Use the filters at the top of the page to narrow down the shipment list.
Depending on your SmartConsign setup, available filters may include:
| Filter | Description |
|---|---|
| Operation | Operation under the actions are taken. |
| Shipper | Filters shipments by the selected shipper. |
| Date Range | Filters shipments within the selected date range. |
| Status | Filters shipments by one or more shipment statuses. |
| Carrier | Filters shipments by carrier. |
| Service | Filters shipments by the selected carrier service. |
| Date Type | Controls which date field the date range applies to, such as Created On, Scanned On, or Shipping On. |
| Sort Order | Controls how results are ordered, such as Newest first or Oldest first. |
| Search Text | Searches by shipment number, reference, customer name, address, or other available shipment information. |
The Date Type filter determines which shipment date is used with the selected date range.
Available date types may include:
- Created On
- Scanned On
- Shipping On
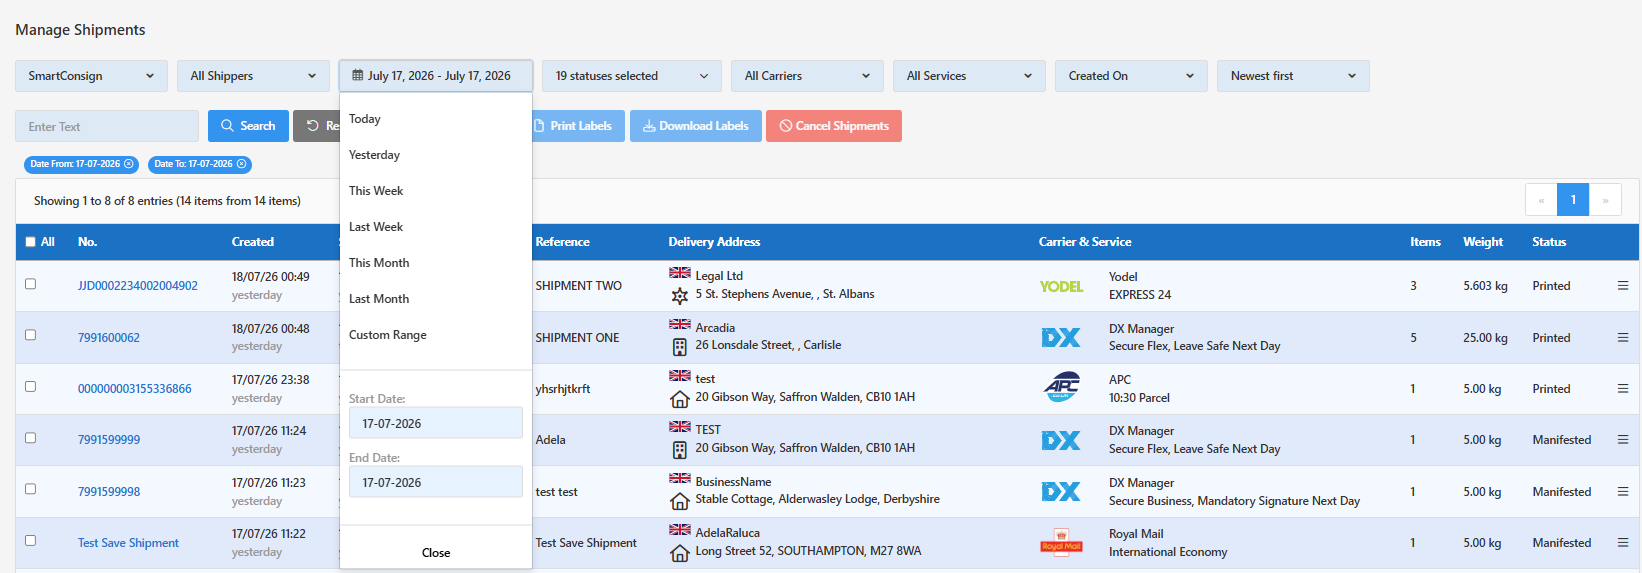
For example:
- Select Created On to search by the date the shipment was created.
- Select Scanned On to search by the carrier or operational scan date.
- Select Shipping On to search by the planned or actual shipping date.
💡 Tip:
When a shipment is not found, confirm that the selected date type matches the date information you are using.
Use the Sort Order filter to control how the results are arranged.
Options include:
- Newest first
- Oldest first

The Carrier and Service filters are linked.
When a carrier is selected, the Service dropdown only shows services available for that carrier.
💡 Tip:
Always select the Carrier before selecting the Service. This helps make sure the service list only contains valid options for the selected carrier.
- Select the required filters.
- Enter a shipment number, reference, customer name, address, or other search text if required.
- Click Search.
Click Reset to clear the current search criteria and return the filters to their default state.
💡 Tip:
If you cannot find a shipment, check the selected date range and status filter first. The shipment may have moved to another shipment status view. Searching with the exact shipment number or reference normally provides the most precise result.
The action buttons displayed above the shipment table apply either to the current search or to selected shipments.
| Button | Description |
|---|---|
| 🔍 Search | Applies the selected filters and search text. |
| 🔄 Reset | Clears the current filters. |
| 📤 Export Data | Exports shipment information from the current filtered results. |
| 🖨️ Print Labels | Prints labels for the selected eligible shipments. |
| ⬇️ Download Labels | Downloads labels for the selected eligible shipments. |
| ❌ Cancel Shipments | Cancels the selected eligible shipments. |
ℹ️ Note:
Print Labels, Download Labels, and Cancel Shipments are normally enabled only after one or more eligible shipment checkboxes have been selected.
The shipment table displays the main information available for each created shipment.
| Column | Description |
|---|---|
| All | Selects all visible eligible records that have an available checkbox. |
| No. | The SmartConsign shipment number. Select it to open Shipment Details. |
| Created | The date and time the shipment was created. |
| Shipping On | The planned or actual shipping date. |
| Shipper | The shipper associated with the shipment. |
| Reference | The shipment or source order reference. |
| Delivery Address | The recipient name and delivery address. |
| Carrier & Service | The carrier and service used to create the shipment. |
| Items | The number of shipment items or parcels. |
| Weight | The total shipment weight. |
| Status | The current shipment status. |
| Actions | Opens the available actions for the individual shipment. |
The statuses available depend on the shipment workflow and carrier tracking information.
Batch actions allow you to apply an action to multiple selected shipments at the same time.
Use the checkbox beside an individual shipment to select it. Use the All checkbox in the table header to select all visible eligible records.
Available batch actions include:
| Batch Action | Description |
|---|---|
| ☑️ All Checkbox | Selects all visible eligible shipments that have a checkbox available. |
| 🖨️ Print Labels | Prints labels for selected shipments in one batch. |
| ⬇️ Download Labels | Downloads labels for selected shipments in one batch. |
| ❌ Cancel Shipments | Cancels selected shipments where carrier and status rules permit cancellation. |
⚠️ Important:
A shipment may not have a checkbox when none of the available batch actions can be applied to it.
⚠️ Manifested shipments:
Manifested shipments cannot normally be included in a batch cancellation.
ℹ️ Saved Shipments:
Saved Shipments are not shown on this page unless explicitly select the Status filter to include them. Also cannot be used for label or carrier-cancellation actions because no carrier shipment exists yet.
Each shipment row includes a menu icon on the right-hand side.
Click the menu icon ☰ to open the available actions for that shipment.
The action buttons are displayed above the shipment table.
| Action | Description |
|---|---|
| Details | Opens the complete Shipment Details page. |
| Print Label | Prints the label for the selected shipment, where available. |
| Download Label | Downloads the label for the selected shipment, where available. |
| Cancel | Cancels the shipment when supported by the carrier and status. |
| Cancel & Rebook | Cancels an eligible shipment and opens its information in Create a Shipment for rebooking. |
ℹ️ Note:
Print Labels, Download Labels, and Cancel Shipments buttons are enabled when one or more shipment checkboxes are selected. Additional actions may be available depending on the shipment status, carrier, account configuration, and user permissions.
You can open the Shipment Details page in either of the following ways:
- Click the shipment number link in the No. column.
- Click the menu icon ☰ and select Details.
The Shipment Details page provides the full shipment record:
- Shipment information
- Sender and collection address
- Recipient and delivery address
- Carrier and service
- Tracking progress
- Shipment pieces
- Shipment-specific actions
- Tickets or operational information
- Manual scan actions, where supported
For more information, see:
Labels can be printed or downloaded from the Manage Shipments page when a label is available for the shipment.
You can print or download labels in two ways:
| Method | Description |
|---|---|
| Batch action | Select one or more eligible shipments using the checkbox column, then click Print Labels or Download Labels. |
| Row action | Click the menu icon ☰ for a shipment, then select Print Label or Download Label. |
Eligible shipments can be cancelled from the Manage Shipments page.
You can cancel shipments in two ways:
| Method | Description |
|---|---|
| Batch cancellation | Select one or more eligible shipments using the checkbox column, then click Cancel Shipments. |
| Row action | Click the menu icon ☰ for a shipment, then select Cancel. |
⚠️ Important:
Manifested shipments cannot be cancelled. If a shipment has already been manifested, cancellation options are not available.
The Cancel & Rebook option cancels the selected shipment and redirects you to Create a Shipment with the same shipment details pre-populated.
Use this option when a shipment needs to be recreated with corrected or updated details.
⚠️ Important:
Cancel & Rebook is not available for manifested shipments.
✅ Best Practice:
The original shipment number can be found when the Cancelled filter is applyed. If needed, record the original shipment before rebooking so that the original and replacement records can be identified during investigation or support.
Orders received from Shopify, Linnworks, eBay, Veeqo, or other connected channels begin in:
Marketplaces → Manage Orders
To convert an external-channel order into a shipment:
- Open Marketplaces → Manage Orders.
- Find the required order.
- Open its actions menu.
- Select Edit.
- The order opens in Create a Shipment.
- Review and complete the required shipment information.
- Select a carrier and service.
- Click Create.
After successful creation, the new shipment can be found and managed from Manage Shipments.
ℹ️ Note:
The source marketplace order and the created carrier shipment represent different stages of the workflow. The order is managed under Manage Orders before shipment creation; the created shipment is managed under Manage Shipments afterward.
Check that:
- The correct date range is selected.
- The correct status filter is selected.
- The correct shipper is selected.
- The shipment number or reference has been entered correctly.
- The shipment has not moved to another shipment status page.
Check that:
- The shipment has been created with a carrier.
- A label is available for the shipment.
- The shipment is not a saved/unallocated record.
Check whether the shipment has been manifested.
Manifested shipments cannot be cancelled or cancelled and rebooked.
A shipment may not be selectable if the action is not available for its current status.
A marketplace order appears in Manage Shipments only after it has been completed and successfully created with a carrier.
Until then, manage it from:
Marketplaces → Manage Orders
A shipment saved directly in the SmartConsign Web UI remains under:
Shipments → Saved Shipments
It appears in Manage Shipments only after it has been completed and created with a carrier service.
Most shipment management issues can be resolved by checking the selected filters, reviewing the shipment status, and confirming whether the required action is available for the shipment.
If you still require assistance, please contact SmartConsign Support at support@smartconsign.io.